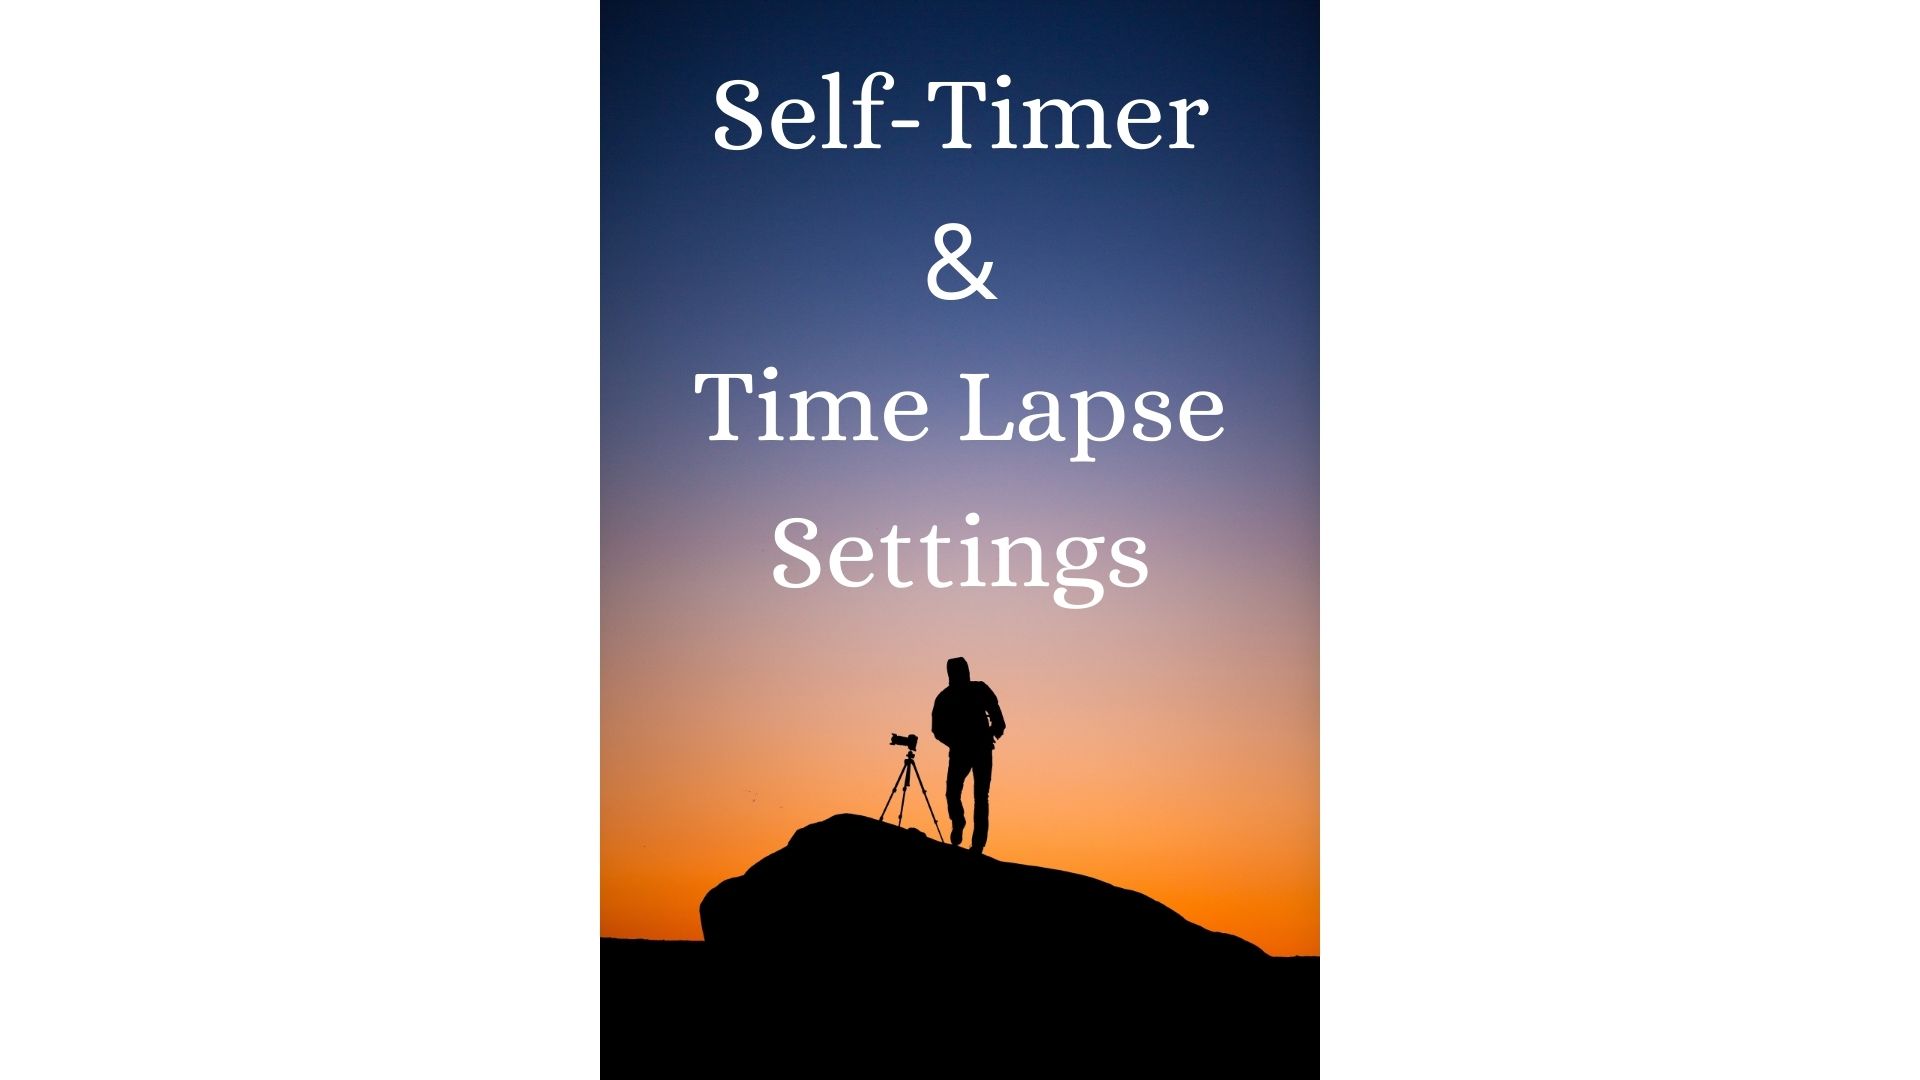
Nikon DSLR camera timelapse and self-timer settings features can be accessed and activated easily. Timelapse is the function in which a camera shoots photographs at predetermined intervals to make a silent time-lapse movie at the frame size and rate set in the movie shooting menu.
Self-portraits or group photographs with the photographer can both benefit from the self-timer.
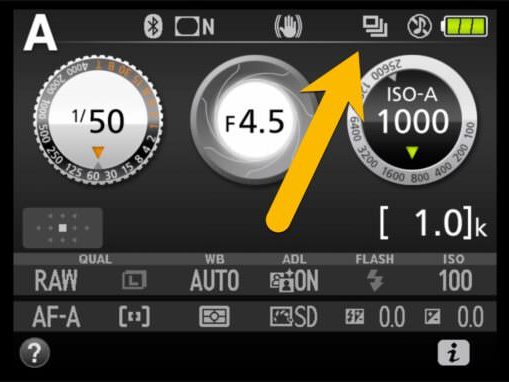
Here are the easy settings with the pictorial presentation to activate timelapse and self-timer on a Nikon DSLR camera.
Nikon DSLR Timelapse settings
Here is how to set up timelapse video settings on a Nikon DSLR:
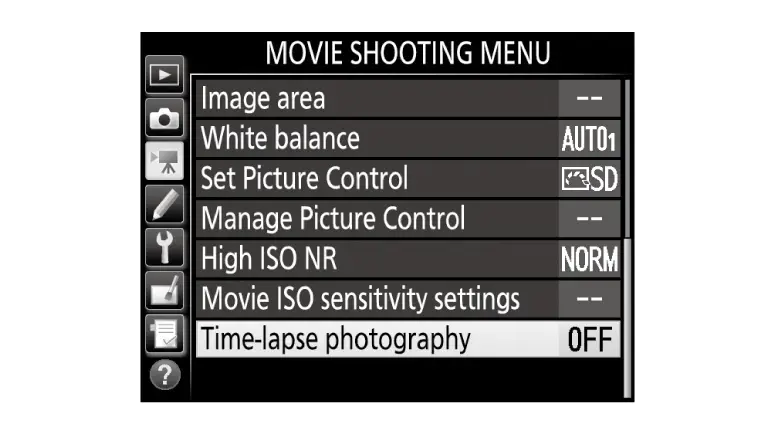
- Turn the camera ON and press the < MENU > button.
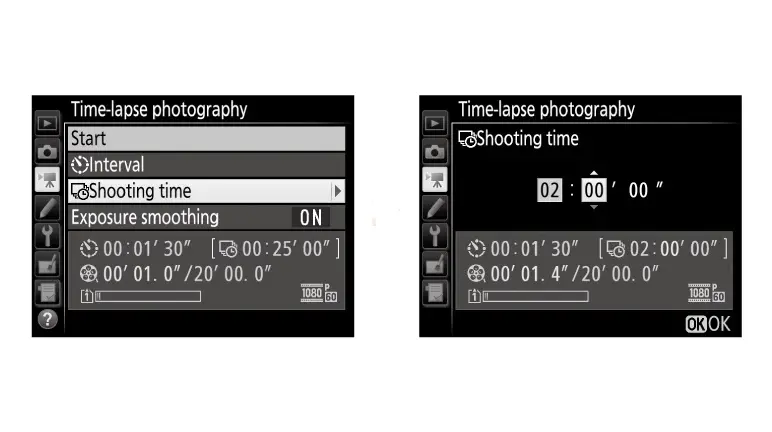
- Select “ Movie Shooting Menu ” and then “ Time-lapse photography ”.
- To reveal time-lapse photography options, push the multi-selector right.
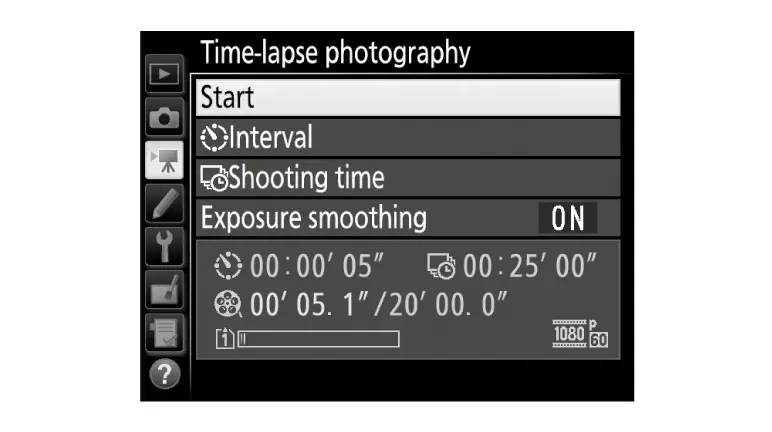
- Change the settings for time-lapse photography. Select an interval, total shooting time, and exposure smoothing choice from the drop-down menus.
To get the time between frames, use the following formula:
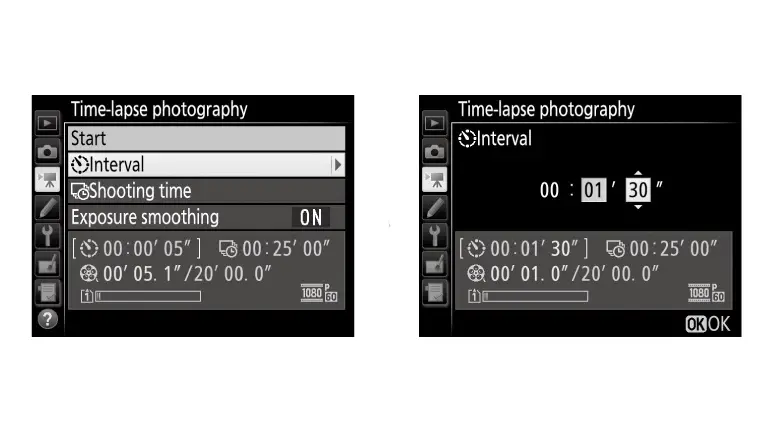
- Select “Interval” and push the right-hand multi-selector.
- Press OK after selecting a period that is longer than the slowest predicted shutter speed (minutes and seconds).
- To determine the entire shooting time, follow these steps:
- Select “Shooting time” and push the right-hand multi-selection.
- Press OK after selecting the shooting time (up to 7 hours 59 minutes).
- To enable or disable exposure smoothing, use the following commands.
- Select “Exposure smoothing” and push the right-hand multi-selection.
- Select an option and click OK.
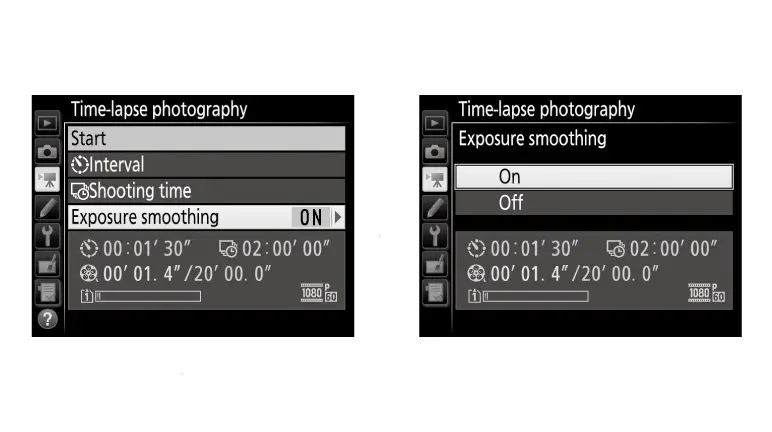
In modes other than M, selecting “On” smooths down sudden changes in exposure (note that exposure smoothing only takes effect in mode M if auto ISO sensitivity control is on).
- To start Shooting
Press OK after selecting “Start.” After roughly 3 seconds, timelapse photography begins. The camera captures photos at the intervals you specify for the amount of time you specify.

When the time-lapse movies are finished, they are saved to the memory card that was selected for Destination in the movie shooting menu.
How to end time-lapse photography settings in a Nikon DSLR camera?
Highlight “Off” in the time-lapse photography menu and press OK to stop time-lapse photography before all the photographs are shot, or hit OK between frames or immediately after a frame is recorded.
From the frames shot till the end of the time-lapse photography, a movie will be generated.
Read Also: Safely format your camera SD card
Quick tips for time-lapse photography
Make sure you’re using a sturdy tripod to keep the camera from moving while you’re shooting.
Make manual adjustments to the exposure and focus so that nothing changes from shot to shot.
Most videos are shot at a frame rate of at least 24 frames per second. So, depending on what you’re filming, you’ll want to modify your images to fit this setting (24 frames / 1 second = 1/24th of a second per frame, or a length of.04 seconds per shot).
In addition, the more photographs you shoot, the more smooth your timelapse will be. However, if you want the blocky effect that some time-lapses may give you (in a good manner! ), shoot fewer photos. So consider how much time you want between shots and how long you want your timelapse to last.
There’s no need to take a photo every ten seconds if your timelapse will run all day! If your timelapse will be less than an hour, though, you should absolutely take additional photos.
Time-lapse supported Nikon Cameras
These cameras support a time-lapse feature.
- Nikon D3300
- Nikon D3400
- Nikon D3s
- Nikon D4
- Nikon D4s
- Nikon D5
- Nikon D500
- Nikon D5000
- Nikon D5100
- Nikon D5200
- Nikon D5300
- Nikon D5500
- Nikon D5600
- Nikon D600
- Nikon D610
- Nikon D700
- Nikon D7000
- Nikon D7100
- Nikon D7200
- Nikon D750
- Nikon D7500
- Nikon D800
- Nikon D800E
- Nikon D810
- Nikon D810A
- Nikon D850
- Nikon D90
- Nikon Df
- Nikon Z7
Time Lapse photography with Nikon Coolpix camera
Nikon DSLR camera timelapse and self-timer settings include the Coolpix camera as well.
Can I do time lapse photography with my Coolpix camera?
Yes! A time-lapse is just a series of images shot at a set interval of time. Taking one photo every two minutes, for example, and then playing them all back at a high frame rate (10 frames per second) will allow you to see slow motion in real-time. This is important for tracking weather trends, plant development, building construction, and other long-term phenomena.
Use of Intervalometer for Coolpix camera time-lapse photography
To use a Coolpix camera for this style of shooting, you’ll need to use an “Intervalometer,” a timer that triggers the shutter at pre-determined intervals. For several Coolpix cameras, Nikon makes the MC-EU1 Remote Cord. One of the features of this cord is that it allows for time-lapse photography. The MC-EU1 can be set to a maximum duration of two minutes. There are two interval modes to choose from:
Mode A of Intervals
When the interval mode is activated, the first photograph is taken; successive photographs in the same series are taken at the specified interval.
Mode B of Intervals
After the interval time has expired, the first photograph is taken; further photographs are taken at the set interval.
Read Also: Best ways to attach a camera strap
How to use Nikon Coolpix camera for time lapse photography?
- To supply continuous power to the camera, use an AC Adapter.
- Use a big memory card to capture a huge number of photographs.
- Set a small image size; time-lapse photographs larger than 640×480 are rarely needed.
- Using manual focus, you can lock the focus.
- Use a lens hood or a mask to protect your lens. In the above sample image without a hood, notice the reflections from the glass.
- Keep the camera safe from the elements and thieves.
Assembling the movie
The images must be stitched together into a movie file after they have been photographed. Most commercial video editing software (such as Apple Final Cut Pro, Adobe Premiere, ArcSoft Video Impression, Apple QuickTime VR Studio, and others) can import still photos and set them on a timeline for viewing as a movie. In order for the movie to display properly, you should keep the time between frames as short as possible. The sample above shows 10 frames (images) each second.
You can also tweak the individual frames before sewing them together (adding or deleting content), but this is a time-consuming operation.
Nikon DSLR Camera Self-Timer settings
There are 2 methods of using the self-timer feature for the Nikon DSLR camera. These two methods are:
- Using camera controlling buttons and menu
- Using shutter release control remote
1. Using Camera Control Buttons and menu
How to Turn On self-timer on a Nikon DSLR camera?
This is how you can use a self-timer on a Nikon DSLR camera with a shutter mode button in 2 easy steps:
- Press < Release Mode Button > with the clock sign and remote sign symbol adjacent to it.
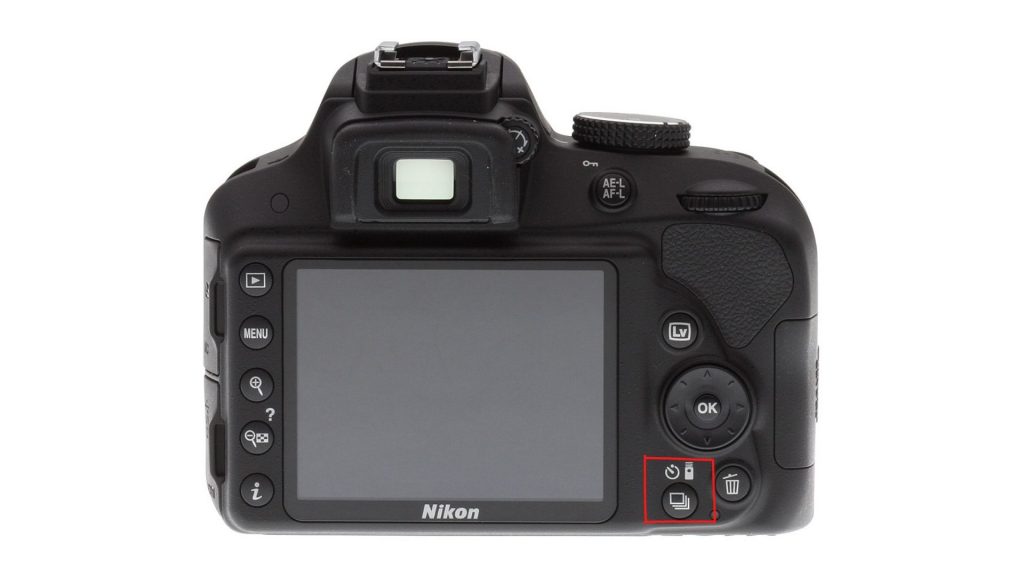
- Select “ Self-Timer Mode ” that highlights 10s on it, now press < OK >.
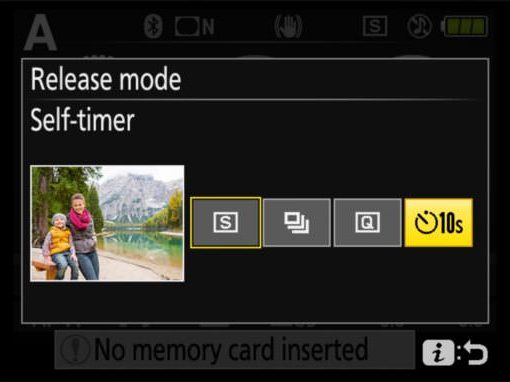
On the back screen, you’ll notice an icon on the screen. This ensures that self-timer has been enabled.
How to set up self-timer settings on a Nikon DSLR camera with button and menu control?
You can change the settings of the self-timer by following these easy steps:
Press < MENU > button and select “🔧(Wrench Icon)” > Self-timer. Now you can adjust two settings.
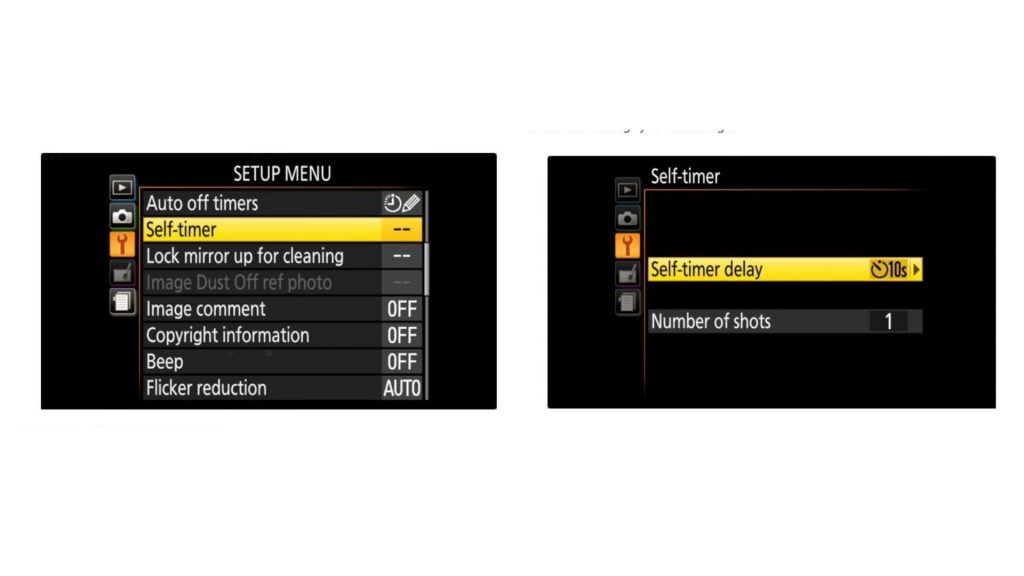
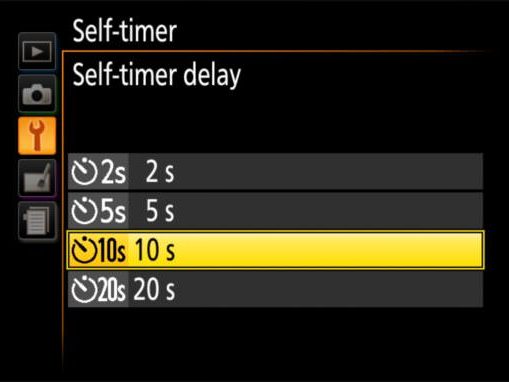
Self-timer delay is the amount of time between pressing the shutter and the first shot being taken. You can choose a suitable time from your camera screen.
Self-timer Number of Shots decides the number of total photos you want to take. You can select any option that you want.
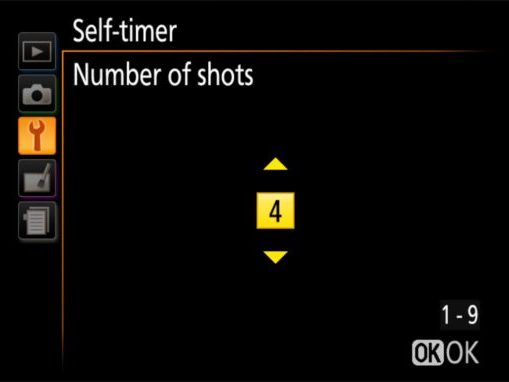
The photo above shows that each successive shot has a 4-second delay (which you can’t change using the delay option).
Focus and take the Photo
To focus, press the shutter-release button halfway down, then the rest of the way down. A beep will begin to sound when the self-timer lamp begins to flash. The lamp will cease blinking two seconds before the photo is taken, and the beeping will become more rapid. Following the commencement of the timer, the shutter will be released ten seconds later.
If the camera fails to focus, you need to make it functional by any mean.
How to adjust self-timer settings on a Nikon DSLR camera using remote control shutter release?
You need to have a remote control shutter release for using this technique. This technique is more useful for those cameras that do not feature a built-in self-timer.
Be Careful about the reuse of Self-timer settings
The camera resets the Release mode to Single Frame, Quiet, or Continuous Low or High after the specified number of shots have been captured. The release mode is reset when the camera is turned off. Either way, the camera selects the Release mode you used before Self-Timer mode.
Cover the viewfinder during self-timer shooting. Otherwise, light may seep into the camera through the viewfinder and affect exposure. Your camera comes with a cover made just for this purpose. Remove the rubber eyepiece that surrounds the viewfinder, and then insert the cover in its place.
5 Uses of the self-timer
Here are the 5 benefits that you can have from using the self-timer feature of a camera.
- For self-portraits or group photo
- For Long-exposure shots
- For Close-up work
- For low-light photography
- Stability
1. For Self-Portrait or Group photo
The most obvious application for the self-timer is for selfies or group shots in which the photographer is present. You know the ones: you line up the group, compose and focus the shot, push the shutter, and then dash around the room to join the others.
Read Also: Flash guide for Nikon Cameras
2. For Long-exposure shots
When capturing long-exposure photographs on a tripod, a self-timer is less commonly used but still highly handy. When triggering the shutter, it’s a convenient approach to decrease camera shake. Because the less the camera shakes, the better, whether you’re photographing cityscapes at night or star trails in astrophotography.
3. For Close-up work
When the camera is placed on a tripod or resting on a solid base, having a timer also eliminates the need for a cable release. You set the timer, and the delay ensures that no hand contact occurs when the shutter is pressed, which could cause the camera to wobble. Because the 10-second delay isn’t actually needed for this, the lesser delays come in helpful.
4. For Low Light Photography
When working in low light, your camera’s self-timer can be used to lessen the risks of camera shake ruining your images, just as it can when working in close-up. Your self-timer will come in handy in dark woodlands where you might be photographing close-ups of fungus at this time of year. Again, you won’t need much of a wait; a few seconds would be enough.
5. Stability
Using your finger on the shutter also causes the camera to tremble. Although having the camera activate the shutter isn’t perfect–mirror slap occurs as the DSLR mirror rises and falls back into place–it’s a lot better than doing it by hand.
Some higher-end cameras have a mirror lock-up mechanism that prevents this, but the Nikon D3500 does not. (The D3500 has a Lock Mirror Up For Cleaning feature, but it’s not the same as the mirror lock-up designed to reduce mirror vibrations in long-exposure photography.)
Important
How do you take good pictures of yourself with a camera?
- Keep the camera as far away from your face as possible.
- Place the camera slightly above your head.
- Make sure the lighting is enough.
- Consider the arrangement.
- Smile!
- Use a timer or an intervalometer to keep track of your progress.
- Make use of a unique shooting mode.
- Learn how to make changes to your images.
How do you set the self-timer on a Nikon d3400?
Go to Menu > Set up and adjust the self-timer to a delay of 10 or 20 seconds; select the number of shots you want to take (from 1-9, with a delay of about 4 seconds in between). Manually focus, hit the Release Mode button, select self-timer, then press the shutter button to begin your portrait.
Read Also: Charge your Nikon camera without a charger
How do I set the timer on my Nikon z5?
Hit the c (E) button, use the multi-selection to highlight [Self-timer], and then press 3.
Using the multi-selector, set the desired shutter-release delay and a number of shots. To select the highlighted option, press J.
Focus on framing the shot and framing the shot.
Set the timer for 10 minutes.
How do you set the self timer on a Nikon d850?
The self-timer can be utilized for self-portraits or to eliminate camera shake.
Select the self-timer option. Turn the release mode dial to E after pressing the release mode dial lock release.
Focus on framing the shot and framing the shot.
Set the timer for 10 minutes.
How do you set the self timer on a Nikon Z50?
Easy! When you push the shutter, it remains open until you release it. You don’t need a remote release if you use the self-timer to start and put your hand or hat over the lens to stop. There is no tally light, and the Nikon Z50 exposes entirely dark.
Does Nikon D3500 have time lapse?
NO. There are no built-in time-lapse functions on the Nikon D3500. It also lacks a port for attaching accessories like intervalometers.
Does Nikon d7100 have time lapse?
YES. Any setting other than Self-Timer or Mirror Up should be used for the Release mode. Press OK after selecting Interval Timer Shooting from the Shooting menu. Select Now or Start Time to begin setting up your capture session.
Read Also: Charge your Nikon Coolpix camera without a charger
Does Nikon d750 have time-lapse?
YES. To reveal time-lapse photography options, pick “Time-lapse photography” from the video shooting menu and push the multi-selector right. 03. Make any necessary adjustments to the time-lapse photography settings. Select an interval, total shooting time, and exposure smoothing choice from the drop-down menus.
Conclusion
Nikon DSLR camera timelapse and self-timer settings can be useful only if you know how to adjust the settings according to a certain condition. The timelapse can be made active through MENU > Movie Shooting Menu > Time-lapse photography. Self-time can be activated through MENU > 🔧 > Self-timer.
FAQs
How do you set the self timer on a Nikon d200?
Press MENU, then select up and down to the pencil symbol on the left. The color LCD will then display CUSTOM SETTING MENU. Toggle down to c TIMERS/AE&AF LOCK and right-click.
Does Nikon D5300 have time lapse?
YES. For time-lapse photography, the D5300 includes an intervalometer built in. Scroll to the second-to-last item in the shooting menu, Interval timer shooting.
How do you change the shutter speed on a Nikon d850?
Rotate the main command dial while the exposure meters are on to select a shutter speed. The shutter speed can be set to “p” or to a range of 30 seconds to 1/8000 seconds. The shutter speed can be set to a specific value (0 Shutter-Speed and Aperture Lock).
- To supply continuous power to the camera, use an AC Adapter.
- Use a big memory card to capture a huge number of photographs.
- Set a small image size; time-lapse photographs larger than 640×480 are rarely needed.
- Using manual focus, you can lock the focus.
- Use a lens hood or a mask to protect your lens. In the above sample image without a hood, notice the reflections from the glass.
- Keep the camera safe from the elements and thieves.
