The Nikon D3200 is a powerful camera with a variety of features. Even if you simply bought it to capture images, to know about shooting video with Nikon D3200 may be useful.
While the beautiful photographs produced by the Nikon D3200 may have been your primary motivation for getting it, you may need to know how to utilize the Nikon D3200 video mode if you find yourself in a circumstance where a video is preferable to a picture.
Nikon’s D3200 is a well-known DSLR camera. It is reasonably priced (in terms of this sort of camera) and user-friendly for those who are new to this type of equipment (such as myself!).
Procedure
Follow these steps for shooting the video on Auto settings with Nikon D3200:
After switching ON the camera, press < Lv > button, now press < Silver color Shutter Button > on top of camera, and then press small < Red Recording Button > to start filming.
- Toggle the power switch to the ON position.
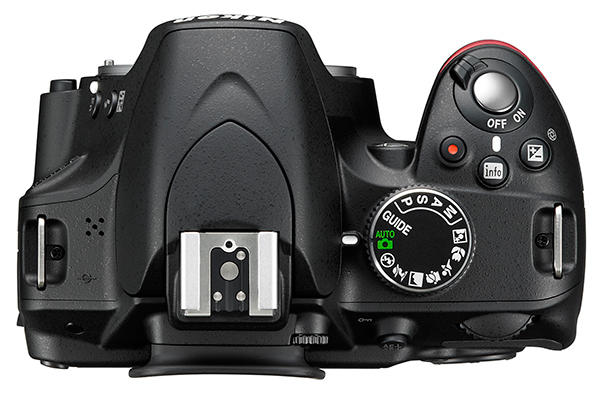
- To activate a live preview of your video, press the Lv button on the back of the camera.
- To focus the lens, press and hold the silver shutter button.

- To begin recording your video, press the red Record button on the Nikon D32oo’s top-right corner.

- When you’re finished, press the red Record button to complete recording the video.
How to record video with Nikon D3200 on manual settings?
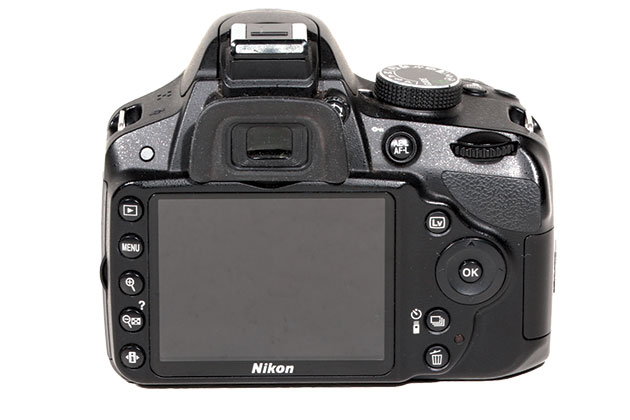
After turning ON the camera, press the < Menu > button, choose ” Movie Settings ” and press < OK >. “Manual Movie Setting” must be ON. Now adjust the settings of frame size/frame rate, movie quality, and microphone. Press < Menu > button again to come back on Home Screen. Now Press < Lv > and then press <Red Recording button> on top right head of the camera.
How to view recorded videos on Nikon D3200?
Press < Play >button on the top left side of camera screen. Now press < OK > button to play the video. You can use < Left > or < Right > buttons adjacent to < OK > button for jumping on other recorded videos. Press < Play > button again to stop the playing video.
Read Also: Self-timer and Timelapse settings for Nikon cameras
Nikon D3200 video specifications
shooting video with Nikon D3200 can be more helpful if you know the video specs:
- Full HD / 1080p (1,920 x 1,080), 720p (1,280 x 720), and 640 x 424 recording
- There are two compression settings to choose from; TTL of high or normal quality (through the lens) Matrix metering using H.264/MPEG-4 encoding on the primary image sensor MOV file format.
- By hitting the shutter button during movie recording, autofocus may be initiated, or continuous AF can be enabled.
- In movie mode, manual focus is also accessible.
- Aperture may be adjusted in the Aperture-priority or Manual exposure modes, but only before the recording starts.
- Manual exposure option allows you to customize the shutter speed and ISO.
- Prior to or during recording, EV adjustment (exposure compensation) can be specified.
- Sensitivity may be adjusted on the built-in monaural or external stereo microphone (both unusual in entry-level DSLRs).
- While in video recording mode, a still image can be obtained, but this pauses the recording.
- Both 60Hz and 50Hz light sources include a flicker-reduction option.
- In-camera trimming allows you to choose exactly the segment of a movie you want and save it as a separate file.
- Single frames from video files can be picked and saved as individual JPEG files.
- There are no specifications for it, however, it appears to be better than average in terms of rolling shutter (see the rolling shutter section at the end of this page for examples).
- Video length is limited to a maximum of 20 minutes.
- Maximum file size is 4 GB, and Class 6 or faster cards are suggested.
Nikon D3200 video Resolution, aspect ratio frame rate, and quality
The Nikon D3200 offers three different video resolutions, three frame rates, and two quality settings in combinations as shown below:
| Resolution | Aspect Ratio | NTSC Mode Frame Rate | Quality |
| 1,920 x 1,080 | 16:9 | 30p(29.97 frames per second, progressive scan) | High/Normal24/12 Mbps |
| 1,920 x 1,080 | 16:9 | 24p(23.976 frames per second, progressive scan) | |
| 1,280 x 720 | 16:9 | 60p(59.94 frames per second, progressive scan) | |
| 640 x 424 | 3:2 | 30p(29.97 frames per second, progressive scan) | High/Normal5/3 Mbps |
All of the video modes on the D3200 are progressive scans, which means that every video line is scanned one by one for each frame. Progressive scan video is substantially better for seeing videos on a computer screen than interlaced scanning. (Interlaced is good for HDTVs, but some computer video players with weak de-interlacing can cause tearing of moving objects.)
Some individuals like the 24 frames per second set because they believe it gives their films a more “movie-like” aesthetic, as 24fps is the frame rate used in cinema. However, when filming in strong light with quick shutter speeds, the lower frame rate might appear choppy.
Read Also: Best Photo quality settings for Nikon D3200
Because the camera can’t utilize a shutter speed longer than 1/60 second, the 60 frames per second frame rate offered in 1,280 x 720 mode are ideal for recording smooth-looking motion, but it won’t be as good in low-light circumstances.
When PAL video mode is chosen, the Nikon D3200 captures video at 25p and 50p instead of 30p and 60p, respectively.
The Nikon D3200 uses MPEG-4 encoding to store video files in the MOV format. Almost any computer or editing application from the previous five years should be able to play the files without issue, while the full 1,920 x 1,080 quality files may put older systems under pressure.
Nikon D3200 video focusing
- The D3200 does not autofocus when recording by default, but you may always force an AF cycle by half-pressing the shutter button.
- Single-shot or continuous servo For continuous AF when recording, use AF (AF-F).
- When using a kit lens, the focus motor noise is highly noticeable in the soundtrack, therefore it’s probably better not to use continuous AF. It’s conceivable that other Nikon lenses with quiet focus motors would be superior.
- Video focusing is the most important part of shooting video with Nikon D3200.
Options for AF area mode:
- AF with a focus on the face
- AF that covers a large region
- AF in a normal area
- AF subject-tracking (Before recording, half-press the shutter button to AF, then push OK with the subject centered in the tiny green square.) Square will retain focus on the topic as it moves around the frame.)
- During movie recording, manual focus is also accessible.
Nikon D3200 video exposure control
- Exposure is set to entirely automated by default, however, exposure compensation can be changed.
- In still capture mode, the auto-ISO limit appears to have no effect on video recording.
- In Aperture-priority or Manual exposure mode, the aperture may be set.
- Aperture control is a minefield: Even if the aperture changes on the rear LCD display, you must quit live view mode completely to set the video recording aperture. (The aperture indicated only pertains to still images taken in Live View mode.)
- The Movie Settings menu may be used to allow manual exposure (very unusual for an entry-level SLR)
- In manual mode, you may adjust the shutter speed, ISO, and aperture in addition to the aperture.
- You may adjust the shutter speed before or during recording, however doing so while recording will result in very loud clicks on the audio track as you turn the control dial.
- The shutter speeds available vary from 1/4000s to 1/60s for 60p, and from 1/30s to 1/30s for 30p and 24p.
- The sensitivity may be modified from ISO 200 to 12,800, but only before the recording begins.
- When recording a video, you can use the entire range of Picture Control options. (Adjustments for contrast, brightness, saturation, and hue for each of the basic settings, as well as Standard, Neutral, Vivid, Monochrome, Portrait, and Landscape.)
- In video mode, AE (auto-exposure) lock is available.
- Regardless of the metering method used, matrix metering is always utilized for video recording.
Read Also: HDR Photography hack for Nikon D3200
Nikon D3200 Audio Recording
- There are a lot more audio recording capabilities than you’d expect from an entry-level SLR.
- Monaural microphone (internal)
- Automatic level control is the default setting.
- Manual level control is provided through the Movie Settings menu, with 20 levels to choose from. A VU (audio level) meter display is also accessible through the Movie Settings menu.
- External stereo mic input – for better sound quality and to avoid camera and lens noise, utilize external mics (a very rare feature in entry-level SLRs).
- The audio may be turned off completely
Choosing Lenses for a DSLR
Using a DSLR has the advantage of allowing you to use a variety of lenses. Millimeters are used to measure focal length. The broader the shot, the lower the focal length. You may adjust the focal length of a zoom lens by zooming in or out.
The biggest benefit of utilizing a zoom lens is its versatility. By twisting the lens, you may shift from broad angle to telephoto. Prime lenses are fixed, although they normally feature a bigger aperture, making them better for low-light situations.
What you shoot will determine the lens you use. Wide angle lenses, for example, appear better when photographing landscapes. I like to use a prime lens, such as the 50mm f1.8 while photographing indoors since the low aperture works better in low light. Choosing the right lens according to the shoot venue should be preferable for shooting video with Nikon D3200.
Features that matter for Manual video shooting of a DSLR
These are the features that matter for manual and auto video shooting of a DSLR:
- Aperture
- ISO
- White Balance
- Focus
- Microphone
- Rolling Shutter
Aperture
The aperture of a lens is the opening via which light enters the camera. F-stops, such as f1.8, f5, or f22, are used to measure aperture. The smaller the f-stop, the more light the camera lets in. The depth of field is also affected by changing the aperture.
When the aperture is adjusted to f1.8, you’ll see that the depth of field is beautiful and shallow. You’ll note that when the aperture is adjusted to f22, we can see considerably deeper into the background. Although a shallow depth of field makes your films appear theatrical, even the tiniest movement can cause your subject to get out of focus.
Hold down the aperture button on top of the Nikon D3200 and use the command dial to set the aperture. On the camera’s LCD display, you’ll see the aperture changing. You can’t change the aperture in Live View on the Nikon D3200.
Read Also: ISO, Aperture, FPS settings for Nikon D3200
ISO
ISO stood for film speed in the days of film cameras. For example, if you were shooting in daylight, you may want to use film with an ISO of 200. If you’re shooting in low light, a more sensitive film like ISO 1600 can be a good choice.
ISO refers to the sensitivity of the camera’s sensor on a digital camera like the Nikon D3200. Depending on the amount of light available, you’ll need to modify the ISO on your camera. However, keep in mind that the higher your ISO, the more grain or digital noise you’ll receive in your photo.
It’s far preferable to have your aperture as wide as possible with a low ISO in low light settings. Simply hold down the Function button on the front of the Nikon D3200 and turn the command dial to alter the ISO.
White Balance
White balance is utilized to guarantee that the color of your light source does not impact your film. If a shot is excessively yellow or blue, it’s likely that the white balance was set wrong. White balance presets on the Nikon D3200 include automatic, incandescent, fluorescent, direct sunshine, flash, cloudy, and shade.
Read Also: Flash uses and guide for Nikon DSLR cameras
Place the pointer in the information display to select one of these settings (i). The current white balance setting is selected. Select OK. Select an option and then hit OK once more. To see how it changes the image, use the Live View button.
You may also manually adjust the white balance. You’ll need a white piece of cardboard for this. On the camera’s side, press the ‘Menu’ button. Select White Balance from the Shooting Menu. Select Preset Manual with the right arrow. If you’ve previously taken a photograph of your white piece of cardboard, choose Use Photo to use that image. Press OK after selecting ‘Measure.’ Select yes and press OK when prompted to replace existing data.
To check the white balance, place a piece of white cardboard in front of the camera, fill the viewfinder, and push the shutter button.
Focus
The Nikon D3200’s automated focus isn’t very good while shooting video. Manually focusing will give you greater control. Simply turn the lens’s button to Manual and adjust the focus ring until your subject is in focus while using the 18-55mm stock lens.
If you’re shooting a static shot, the Zoom In button on the rear of the camera may be used to fine-tune the focus. Use the multi-selector in Live View to find a region of your shot with a lot of information, such as the subject’s eye. To magnify that region, use the Zoom In button.
The focus ring should be turned until your subject is absolutely in focus.
Microphone
The D3200’s built-in microphone is a complete disaster. It’s a good idea to utilize an external mic with most DSLRs. The Rode VideoMic, which comes with this shock mount to eliminate any handling noise, is one of my favorites.
To begin, connect the shotgun microphone to the cold shoe. Make sure it’s securely screwed in and that the microphone wire is plugged into the D3200’s microphone input. The rear of the camera has a power switch for when you’re ready to shoot. Switch it to the on position, making sure it’s not set to low cut, which will limit low-frequency noises.
If you’re shooting in windy circumstances or want to decrease rumble or pops, this is a good option. Always use headphones to monitor your audio, but don’t use them if you’re unsure. In post-production, you can always do a low cut.
Read Also: Guide to format your camera SD card safely
Rolling Shutter
The Nikon D3200, like other DSLRs, suffers from a rolling shutter, which causes the image to distort when panning fast. Although there are filters that can prevent rolling shutter, it’s preferable to avoid panning at all. Be aware of the limits of the Nikon D3200, or any other DSLR camera, if you want to use it for filmmaking. shooting video with Nikon D3200
Is Nikon D3200 good for vlogging?
The Nikon D3200 is ideal for YouTube videos since it shoots 1080p HD video, and features a microphone connection, and an LCD screen. It also boasts automated ISO and focus, resulting in crisp and bright film. Because the camera is a bit pricey, professional YouTubers will be the perfect customers.
What memory card does a Nikon D3200 use?
Regular SD cards, SDHC (Secure Digital High Capacity) cards, and SDXC (Secure Digital eXtended Capacity) cards are all compatible with the Nikon D3200. The SD card format, which can contain up to 2GB of data, is no longer widely utilized. The SDHC format can hold up to 32GB of data, while the SDXC format can hold up to 2TB.
Does D3200 have autofocus motor?
Because the D3200 lacks an autofocus motor, the only option to achieve autofocus is to utilize lenses with built-in motors.
Conclusion
Shooting video with Nikon D3200 is super easy. You can record videos in auto mode by activating the Live View, focusing the lens, and start recording by pressing the record button. You can also record videos in manual mode by adjusting the settings in the Manual Movie Settings option of the camera.
FAQs
Is Nikon D3200 good for video recording?
The video output of the Nikon D3200 is remarkably comparable to that of its predecessor, the Nikon D3100, as well as other recent Nikon entry-level and mid-range DSLRs. When filming in low light, the camera produces high-quality movie footage with smooth action, no obvious artifacts, and comparably low picture noise levels.
Does Nikon D3200 have video mode?
The Nikon D3200 is no exception to the rule that most DSLRs now have HD video recording. The video system on the Nikon D3200 is remarkably robust for an entry-level camera, with exposure control and audio recording capabilities that much exceed those found on other entry-level cameras.
How long can Nikon D3200 record video?
The length of time you may record is determined by the capacity of your memory card. You’ll be able to record in 20-minute “takes,” with a countdown showing on the screen as the video is being recorded.
Featured Image: Ashleigh via Flicker.com
